[VirtualBox] 在 Mac 上使用 minicom 連上 VirtualBox 的 serial port
最近要在公司 Debug Hacks 的讀書會報告,
其中一個是 Hack#16 以 minicom 連上 serial console~
書上提到的步驟是以實際 serial 線路連線後另一台 Linux 後,
從本機 Linux 用 minicom 操作另一台 Linux,算是 Linux 對 Linux 的操作,
不過因為我的主要工作機是 Mac,因此設定了一台 Linux VM,
改成用 Mac 對 Linux VM 操作看看囉~
參考資料:Setting up Serial Console on VirtualBox
1. 開啟被連端 (Linux VM) 上的 COM port
我是使用 VirtualBox 建立虛擬機器的,先將 VM 關機後,
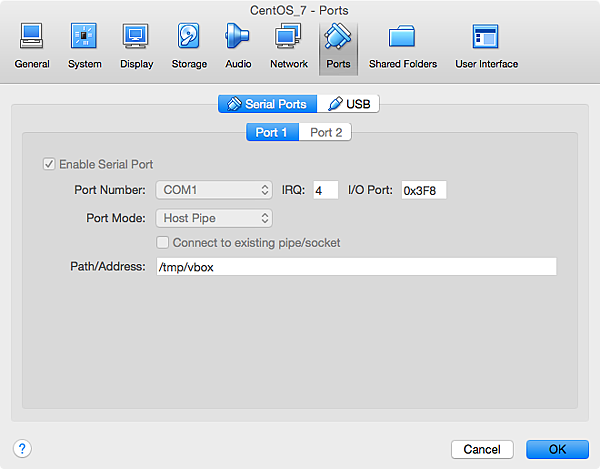
到 VM > Machine > Settings > Ports 這一頁,
把 Enable Serial Port 打勾,設定使用 COM1 port,
Port mode 設定成 Host Pipe,這樣就能透過 named pipe 來模擬 serial 連線~
在 Path/Address 這邊設定一個 named pipe 的檔案路徑,
像我是照範例寫的,設定在 /tmp/vbox 這個檔案上,
這個檔案 VirtualBox 會幫我們建立出來~

設定好後,再將 Linux VM 開機~
2. 確定要被連端 (Linux VM) 的 tty 狀態
在 Linux VM 上執行 stty -F /dev/ttyS0 -a 來看 COM port 1 的狀態,
可以看到目前的 baud rate 是 9600~
這個速率待會在 minicom 那邊也要設定成一樣的:
[root@localhost ~]# stty -F /dev/ttyS0 -a
speed 9600 baud; rows 0; columns 0; line = 0;
intr = ^C; quit = ^; erase = ^?; kill = ^U; eof = ^D; eol = <undef>;
eol2 = <undef>; swtch = <undef>; start = ^Q; stop = ^S; susp = ^Z; rprnt = ^R;
werase = ^W; lnext = ^V; flush = ^O; min = 1; time = 0;
-parenb -parodd -cmspar cs8 hupcl -cstopb cread clocal -crtscts
-ignbrk -brkint -ignpar -parmrk -inpck -istrip -inlcr -igncr icrnl ixon ixoff
-iuclc -ixany -imaxbel -iutf8
opost -olcuc -ocrnl onlcr -onocr -onlret -ofill -ofdel nl0 cr0 tab0 bs0 vt0 ff0
isig icanon -iexten echo echoe echok -echonl -noflsh -xcase -tostop -echoprt
-echoctl echoke
3. 在 Mac 上使用 minicom 連上 Linux VM
首先在 Mac 上用 Homebrew 安裝 minicom 程式:
brew install minicom
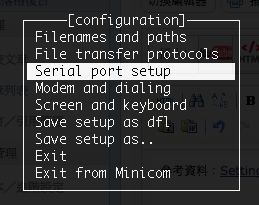
接著要設定一下 minicom… 執行 minicom -s 開始設定,
可以看到像下面的畫面,進到 Serial port setup 子選單中:

這邊的話可以按 A 來改變 Serial Device,像我們是使用 unix named pipe,
這邊就打 unix#<pipe file name>,例如:unix#/tmp/vbox~
改好後按 Enter 就會離開這個子選單:

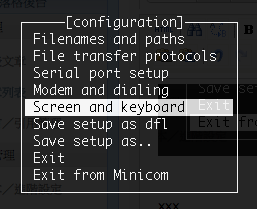
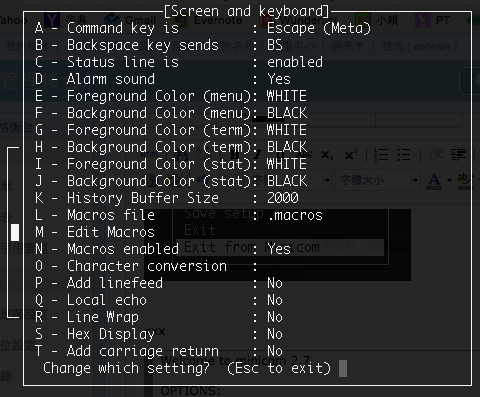
另一個要注意的是鍵盤的設定,進到 Screen and keyboard 子選單中:

這邊不需要修改東西,只是要確認一下 Command key~
例如這邊的 Command key 是 Escape (就是 ESC),
後面有個 (Meta),平常在 minicom 裡面常常會看到 Meta+Z 之類的組合鍵,
在這個狀況下代表的就是按下 ESC 的同時也按下 Z:

確定沒問題後,選擇 Save setup as dfl 將設定儲存:

再點 Exit from Minicom 就可以離開設定程式了:

設定好之後,就可以直接執行 minicom 來連上遠端的 Linux VM~
連上去後,可以看到類似下面的畫面:
Welcome to minicom 2.7
OPTIONS:
Compiled on Sep 16 2015, 23:28:45.
Port unix#/tmp/vbox
Press Meta-Z for help on special keys
注意到畫面中有提到 Meta-Z 可以看求助訊息,這時按下 ESC + Z 就會出現囉~
可以在下面的畫面中看到更多的操作鍵:

4. 確認 Mac 與 Linux VM 間的 serial connection 是通的
到 Linux VM 端,送一個字串到 /dev/ttyS0 (就是 COM1),
如果連線是通的話,就會通過 /tmp/vbox 這個 named pipe 將字串送給 Mac 端的 minicom 程式:
echo "sent from guest" > /dev/ttyS0
在 Mac 端就可以看到接收到的字串囉:
Welcome to minicom 2.7
OPTIONS:
Compiled on Sep 16 2015, 23:28:45.
Port unix#/tmp/vbox
Press Meta-Z for help on special keys
sent from guest
5. 使用 minicom 登入遠端的 Linux VM
如果在 Linux VM 端執行 agetty service 的話,minicom 這一端就可以看到 Linux VM 的登入畫面,
打入帳號密碼就能登入 Linux VM 囉~
因為我的 Linux VM 是 CentOS 7,因此是用 systemctl 來控制 service,
在之前的版本應該可以使用 /etc/inittab 來操作~
首先建立 /usr/lib/systemd/system/agetty.service 這個檔案,內容如下:
[Unit]
Description=agetty
After=getty.target
[Service]
Type=simple
User=root
Group=root
Restart=always
ExecStart=/sbin/agetty ttyS0 9600 vt100-nav
TimeoutSec=0
[Install]
WantedBy=multi-user.target
接著就可以啟用這個服務:
systemctl start agetty.service
systemctl enable agetty.service
當 Linux VM 的 agetty service 有在執行時,
Mac 的 minicom 這一端應該就能看到 Linux VM 的登入提示了,
沒有的話可以按一下 Enter 鍵看看是不是會出來~
這邊輸入帳號密碼後,就透過 serial connection 登入成功囉,可以執行指令了:
Welcome to minicom 2.7
OPTIONS:
Compiled on Sep 16 2015, 23:28:45.
Port unix#/tmp/vbox
Press Meta-Z for help on special keys
CentOS Linux 7 (Core)
Kernel 3.10.0-229.el7.x86_64 on an x86_64
localhost login: root
Password:
Last login: Thu Sep 17 23:15:25 from macbook-pro
[root@localhost ~]#