[Windows] CER、PVK、PFX 檔案與 PE 檔的數位簽章
之前在 Windows 上是用 signcode.exe 來對執行檔加簽章 (digital sign),
不過現在已經找不到 signcode.exe 了,變成了 signtool.exe,
在使用 signtool.exe 時又發現建立 self-signed certificate 有遇到一些問題,
決定來稍微統整一下資訊囉~
主要是參考 How do I create a self-signed certificate for code signing on Windows? 這篇,
有提到用 makecert 產生 self-signed certificate,以及用 signtool 加簽的步驟~
1. 用 MakeCert 產生公開憑證與私鑰
首先得用 MakeCert 產生一組公開的憑證 (certificate) 與對應的私鑰 (private key),
這樣才能拿來測試將 PE 檔加簽章這個動作。
在我的 Windows 7 上,makecert.exe 是在 C:Program FilesWindows Kits8.1binx86 目錄,
這應該是在安裝 Windows SDK 或 Visual Studio 時裝進來的~
先來看一下 MakeCert 的選項吧,
加上 -! 還可以秀出延伸選項,非常的多:
c:>makecert /?
Usage: MakeCert [ basic|extended options] [outputCertificateFile]
Basic Options
-sk  <keyName>      Subject's key container name; To be created if not present
-pe                 Mark generated private key as exportable
-ss  <store>        Subject's certificate store name that stores the output
certificate
-sr  <location>     Subject's certificate store location.
<CurrentUser|LocalMachine>.  Default to 'CurrentUser'
-#   <number>       Serial Number from 1 to 2^31-1.  Default to be unique
-$   <authority>    The signing authority of the certificate
<individual|commercial>
-n   <X509name>     Certificate subject X500 name (eg: CN=Fred Dews)
-?                  Return a list of basic options
-!                  Return a list of extended options
c:>makecert -!
Usage: MakeCert [ basic|extended options] [outputCertificateFile]
Extended Options
-tbs <file>         Certificate or CRL file to be signed
-sc  <file>         Subject's certificate file
-sv  <pvkFile>      Subject's PVK file; To be created if not present
-ic  <file>         Issuer's certificate file
-ik  <keyName>      Issuer's key container name
-iv  <pvkFile>      Issuer's PVK file
-is  <store>        Issuer's certificate store name.
-ir  <location>     Issuer's certificate store location
<CurrentUser|LocalMachine>.  Default to 'CurrentUser'
-in  <name>         Issuer's certificate common name.(eg: Fred Dews)
-a   <algorithm>    The signature's digest algorithm.
<md5|sha1|sha256|sha384|sha512>.  Default to 'sha1'
-ip  <provider>     Issuer's CryptoAPI provider's name
-iy  <type>         Issuer's CryptoAPI provider's type
-sp  <provider>     Subject's CryptoAPI provider's name
-sy  <type>         Subject's CryptoAPI provider's type
-iky <keytype>      Issuer key type
<signature|exchange|<integer>>.
-sky <keytype>      Subject key type
<signature|exchange|<integer>>.
-l   <link>         Link to the policy information (such as a URL)
-cy  <certType>     Certificate types
<end|authority>
-b   <mm/dd/yyyy>   Start of the validity period; default to now.
-m   <number>       The number of months for the cert validity period
-e   <mm/dd/yyyy>   End of validity period; defaults to 2039
-h   <number>       Max height of the tree below this cert
-len <number>       Generated Key Length (Bits)
Default to '2048' for 'RSA' and '512' for 'DSS'
-r                  Create a self signed certificate
-nscp               Include Netscape client auth extension
-crl                Generate a CRL instead of a certificate
-eku <oid[<,oid>]>  Comma separated enhanced key usage OIDs
-?                  Return a list of basic options
-!                  Return a list of extended options
因為只是測試用的,這邊就只選擇最最必要的參數了,
用 -sv 參數指定輸出 PVK (private key) 檔案以及 CER (certificate) 檔案:
c:>makecert -sv test.pvk test.cer
Succeeded
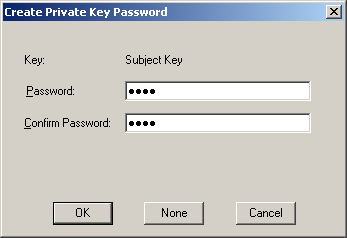
在執行 MakeCert 的過程中,會跳出如下的視窗,要輸入 private key 的密碼:


至於這邊要建立的 PVK 和 CER,還有待會會看到的 PFX 檔案,是什麼東西呢?
在 Certificate Files: .Cer x .Pvk x .Pfx 這篇中有一些解釋,簡述如下:
– CER: X.509 憑證,常見的是二進位的 ASN.1 DER 格式,或是 base64 編碼過的 PEM 格式。
目前 Makecert 產生出來的 CER 是二進位格式。
– PVK: 用來儲存私鑰 (private key),這是一種 Windows 獨有的檔案格式 (可參考 PVK file information)。
– PFX: Personal Exchange Format, 是 PKCS12 格式的檔案。
可以放非常多種類的資訊,如憑證、Root CA 根憑證,也可以放私鑰 (private key)。
也就是說,我們剛剛讓 makecert 自己產生一組 public/private key,
將 private key 儲存在 .pvk 中,public key 的資訊則儲存成 .cer~
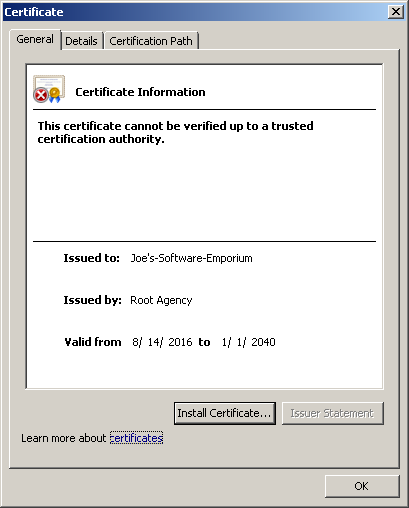
我們可以在 Windows 檔案總管中點兩下 .cer 檔,看一下它的資訊,
注意這個憑證的簽章者 (CA) 是 Root Agency,發給 Joe’s-Software-Emporium:

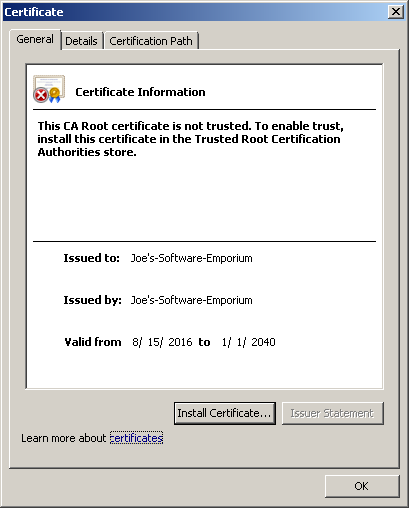
如果在剛剛的 makecert 指令中,多加上 -r 參數的話,會建立 self-signed certificate,
也就是 Joe’s-Software-Emporium 本身就是 Root CA,這張憑證是它自己簽章的:

2. 用 pvk2pfx 將 PVK 檔轉成 PFX 檔
待會如果要用 signtool 對 PE 檔案加數位簽章的話,必須要給 signtool 一個 PFX 檔案,
而 PFX 檔案可以由剛剛產生出來的 public key (CER) 和 private key (PVK) 合併而成~
這個工作可以藉由 pvk2pfx.exe 來完成,先看一下它的用法:
c:>pvk2pfx
Usage:
pvk2pfx -pvk <pvk-file> [-pi <pvk-pswd>] -spc <spc-file>
[-pfx <pfx-file> [-po <pfx-pswd>] [-f]]
-pvk <pvk-file>  - input PVK file name.
-spc <spc-file>  - input SPC file name.
-pfx <pfx-file>  - output PFX file name.
-pi <pvk-pswd>   - PVK password.
-po <pfx-pswd>   - PFX password; same as -pi if not given.
-f               - force overwrite existing PFX file.
if -pfx option is not given, an export wizard will pop up. in
this case, options -po and -f are ignored.
它有幾個必要選項,
-pvk 要給 PVK 檔案的路徑,
-spc 要給 SPC 檔案的路徑 (SPC 是 Software Publisher Certificate,就是剛產生出來的 .CER 檔),
-pfx 則是要輸出的 PFX 檔案。
下面這個例子會將 test.pvk 和 test.cer 合併成 test.pfx:
pvk2pfx -pvk test.pvk -spc test.cer -pfx test.pfx
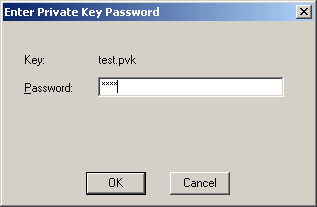
過程中一樣會跳出視窗,詢問 private key 的密碼:

我們可以在檔案總管中,看一下剛剛產生出來的 CER, PVK, PFX 檔案:
CER 就是一個公開憑證檔 (certificate),
PVK 是特有格式,檔案總管自己也認不得 (可能沒有特別註冊 .pvk 副檔名),
PFX 圖示上有個鑰匙,代表這是含有 private key 與 public key 的檔案:

3. 使用 signtool 將 PE 檔案加上數位簽章
要用 signtool 加數位簽章的話,要用 sign 指令,
下面先看一下 sign 指令可以使用的參數吧 (也是爆多):
c:>signtool sign /?
Usage: signtool sign [options] <filename(s)>
Use the "sign" command to sign files using embedded signatures. Signing
protects a file from tampering, and allows users to verify the signer (you)
based on a signing certificate. The options below allow you to specify signing
parameters and to select the signing certificate you wish to use.
Certificate selection options:
/a          Select the best signing cert automatically. SignTool will find all
valid certs that satisfy all specified conditions and select the
one that is valid for the longest. If this option is not present,
SignTool will expect to find only one valid signing cert.
/ac <file>  Add an additional certificate, from <file>, to the signature block.
/c <name>   Specify the Certificate Template Name (Microsoft extension) of the
signing cert.
/f <file>   Specify the signing cert in a file. If this file is a PFX with
a password, the password may be supplied with the "/p" option.
If the file does not contain private keys, use the "/csp" and "/kc"
options to specify the CSP and container name of the private key.
/i <name>   Specify the Issuer of the signing cert, or a substring.
/n <name>   Specify the Subject Name of the signing cert, or a substring.
/p <pass.>  Specify a password to use when opening the PFX file.
/r <name>   Specify the Subject Name of a Root cert that the signing cert must
chain to.
/s <name>   Specify the Store to open when searching for the cert. The default
is the "MY" Store.
/sm         Open a Machine store instead of a User store.
/sha1 <h>   Specify the SHA1 thumbprint of the signing cert.
/fd         Specifies the file digest algorithm to use for creating file
signatures. (Default is SHA1)
/u <usage>  Specify the Enhanced Key Usage that must be present in the cert.
The parameter may be specified by OID or by string. The default
usage is "Code Signing" (1.3.6.1.5.5.7.3.3).
/uw         Specify usage of "Windows System Component Verification"
(1.3.6.1.4.1.311.10.3.6).
Private Key selection options:
/csp <name> Specify the CSP containing the Private Key Container.
/kc <name>  Specify the Key Container Name of the Private Key.
Signing parameter options:
/as         Append this signature. If no primary signature is present, this
signature will be made the primary signature instead.
/d <desc.>  Provide a description of the signed content.
/du <URL>   Provide a URL with more information about the signed content.
/t <URL>    Specify the timestamp server's URL. If this option is not present,
the signed file will not be timestamped. A warning is generated if
timestamping fails.
/tr <URL>   Specifies the RFC 3161 timestamp server's URL. If this option
(or /t) is not specified, the signed file will not be timestamped.
A warning is generated if timestamping fails.  This switch cannot
be used with the /t switch.
/tseal <URL> Specifies the RFC 3161 timestamp server's URL for timestamping a
sealed file.
/td <alg>   Used with the /tr or /tseal switch to request a digest algorithm
used by the RFC 3161 timestamp server.
/seal       Add a sealing signature if the file format supports it.
/itos       Create a primary signature with the intent-to-seal attribute.
/force      Continue to seal or sign in situations where the existing signature
or sealing signature needs to be removed to support sealing.
/nosealwarn Sealing-related warnings do not affect SignTool's return code.
PKCS7 options:
/p7 <path>    Specifies that for each specified content file a pkcs7 file is
produced. The pkcs7 file will be named: <path><file>.p7
/p7co <OID>   Specifies the <OID> that identifies the signed content.
/p7ce <Value> Defined values:
Embedded           - Embeds the signed content in the pkcs7.
DetachedSignedData - Produces the signed data part of
a detached pkcs7.
The default is 'Embedded'
Other options:
/ph         Generate page hashes for executable files if supported.
/nph        Suppress page hashes for executable files if supported.
The default is determined by the SIGNTOOL_PAGE_HASHES
environment variable and by the wintrust.dll version.
/q          No output on success and minimal output on failure. As always,
SignTool returns 0 on success, 1 on failure, and 2 on warning.
/v          Print verbose success and status messages. This may also provide
slightly more information on error.
/debug      Display additional debug information.
我們用 /v 參數顯示多一些資訊,/f 指定剛剛產生的 PFX 檔案 (例子中用的是 self-signed certificate),
最後的參數我們指定要幫 notepad.exe 加一個數位簽章:
c:>signtool sign /v /f test.pfx notepad.exe
The following certificate was selected:
Issued to: Joe's-Software-Emporium
Issued by: Joe's-Software-Emporium
Expires:   Sun Jan 01 07:59:59 2040
SHA1 hash: F979540654D74C380F797DB6A7BA6D729A570E43
Done Adding Additional Store
Successfully signed: notepad.exe
Number of files successfully Signed: 1
Number of warnings: 0
Number of errors: 0
執行之後,可以到檔案總管對 notepad.exe 按右鍵,
Properties 上會多出一個 Digital Signatures 分頁,裡面就是我們的 self-signed certificate 囉:
