[Azure] 使用 AKS Engine 在舊版的 Azure Stack Hub 上建立 Kubernetes 叢集
因為專案的關係,目前我們租用了外面的 Azure Stack Hub (ASH),
只是上面的版本有點舊,
所以 AKS (Azure Kubernetes Service) 還不提供。
但我們又很需要 K8S,這下只能自己想辦法了…
同事研究了 AKS Engine 這個東西,看起來可以在舊版的 ASH 上架 K8S,
那就來看一下怎麼做吧~
1. 產生 SSH public/private key
AKS Engine 會建立一台 master 節點 VM、和多台 worker 節點 VM,
而如果想要連進去這些 VM 時,就需要 SSH key。
因此這個步驟就是在準備相關的 SSH key,
方便之後可以用 SSH 連進節點 VM:
rm -rf /tmp/tmp_aks
mkdir -p /tmp/tmp_aks
cd /tmp/tmp_aks

# Generate ssh key
ssh-keygen -t rsa -f aks_engine_sshkey -q -N ""
SSH_PUB_KEY=$(cat aks_engine_sshkey.pub)
2. 下載 AKS Engine
下載 AKS engine 並解壓縮:
# Download aks-engine package
AKSE_VERSION="v0.67.3"
AKSE_ZIP_NAME="aks-engine-${AKSE_VERSION}-linux-amd64.tar.gz"
AKSE_ZIP_URL="https://github.com/Azure/aks-engine/releases/download/${AKSE_VERSION}/${AKSE_ZIP_NAME}"
curl -L -s -f -O "${AKSE_ZIP_URL}"
tar zxvf "${AKSE_ZIP_NAME}"
3. 準備 AKS Engine 的組態檔
準備一個 clusterDefinition.json 組態檔 (檔名可自取),
裡面會需要提供許多資訊,像是 master 節點所在的子網路 (subnet)、
worker 節點所在的子網路、Azure Service Principal 的資訊等等:
LOCATION="taipei"
FQDN="taipei.azure.corpnet.net"
INFRA_RESOURCE_GROUP="infra-rg"
IDENTITY_SYSTEM="azure_ad"
CLUSTER_PREFIX="aks-cluster"
AKS_MASTER_SUBNET_ID="/subscriptions/11111111-2222-3333-4444-555555555555/resourceGroups/infra-rg/providers/Microsoft.Network/virtualNetworks/infra-vnet/subnets/aksm-sn"
AKS_MASTER_FIRST_IP="192.168.0.40"
AKS_WORKER_SUBNET_ID="/subscriptions/11111111-2222-3333-4444-555555555555/resourceGroups/infra-rg/providers/Microsoft.Network/virtualNetworks/infra-vnet/subnets/aksw-sn"
TF_VAR_client_id="<service principal id>"
TF_VAR_client_secret="<service principal password>"
TF_VAR_subscription_id="11111111-2222-3333-4444-555555555555"

# Output API model
cat << EOF > clusterDefinition.json
{
  "apiVersion": "vlabs",
  "location": "${LOCATION}",
  "properties": {
    "orchestratorProfile": {
      "orchestratorType": "Kubernetes",
      "orchestratorRelease": "1.19",
      "kubernetesConfig": {
        "kubernetesImageBase": "mcr.microsoft.com/k8s/azurestack/core/",
        "useInstanceMetadata": false,
        "networkPlugin": "azure",
        "networkPolicy": "",
        "containerRuntime": "docker",
        "cloudProviderBackoff": true,
        "cloudProviderBackoffRetries": 1,
        "cloudProviderBackoffDuration": 30,
        "cloudProviderRateLimit": true,
        "cloudProviderRateLimitQPS": 3,
        "cloudProviderRateLimitBucket": 10,
        "cloudProviderRateLimitQPSWrite": 3,
        "cloudProviderRateLimitBucketWrite": 10,
        "kubeletConfig": {
          "--node-status-update-frequency": "1m",
          "--max-pods": "50"
         },
        "controllerManagerConfig": {
          "--node-monitor-grace-period": "5m",
          "--pod-eviction-timeout": "5m",
          "--route-reconciliation-period": "1m"
        },
        "addons": [
          {
            "name": "tiller",
            "enabled": false
          }
        ]
      }
    },
    "customCloudProfile": {
      "portalURL": "https://portal.${FQDN}/",
      "authenticationMethod": "client_secret",
      "identitySystem": "${IDENTITY_SYSTEM}"
    },
    "masterProfile": {
      "dnsPrefix": "${CLUSTER_PREFIX}",
      "distro": "aks-ubuntu-18.04",
      "osDiskSizeGB": 50,
      "availabilityProfile": "AvailabilitySet",
      "count": 1,
      "vmSize": "Standard_D2_v2",
      "vnetSubnetId": "${AKS_MASTER_SUBNET_ID}",
      "firstConsecutiveStaticIP": "${AKS_MASTER_FIRST_IP}"
    },
    "agentPoolProfiles": [
      {
        "name": "linuxpool",
        "osDiskSizeGB": 50,
        "AcceleratedNetworkingEnabled": false,
        "distro": "aks-ubuntu-18.04",
        "count": 3,
        "vmSize": "Standard_D2_v2",
        "availabilityProfile": "AvailabilitySet",
        "vnetSubnetId": "${AKS_WORKER_SUBNET_ID}"
      }
    ],
    "linuxProfile": {
      "adminUsername": "azureuser",
      "ssh": {
        "publicKeys": [
          {
            "keyData": "${SSH_PUB_KEY}"
          }
        ]
      }
    },
    "windowsProfile": {
      "adminUsername": "azureuser",
      "adminPassword": "",
      "sshEnabled": true
    },
    "servicePrincipalProfile": {
      "clientId": "${TF_VAR_client_id}",
      "secret": "${TF_VAR_client_secret}"
    }
  }
}
EOF
4. 使用 AKS Engine 建立 K8S
上一步準備好 clusterDefinition.json 後,
就可以執行 AKS Engine 來建立 K8S:
# Run AKS engine to build cluster
./aks-engine-*/aks-engine deploy -f \
 -g "${INFRA_RESOURCE_GROUP}" \
 --api-model clusterDefinition.json \
 --auth-method client_secret \
 --azure-env AzureStackCloud \
 --location "${LOCATION}" \
 --client-id "${TF_VAR_client_id}" \
 --client-secret "${TF_VAR_client_secret}" \
 --identity-system "${IDENTITY_SYSTEM}" \
 --subscription-id "${TF_VAR_subscription_id}"
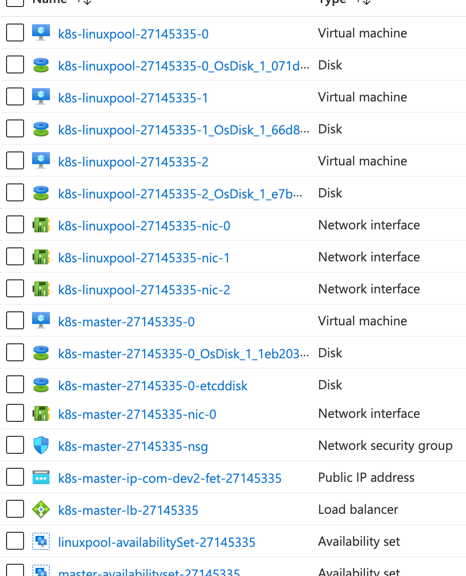
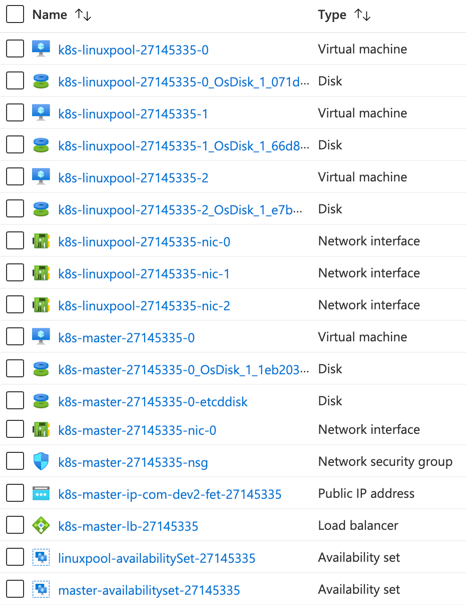
AKS Engine 會建立如下資源,
可以看出來會有數個 master/worker 節點 VM:
5. 設定 kubectl
AKS Engine 執行成功後,會產生一個 _output 目錄,
裡面可以找到 kubeconfig.{LOCATION}.json,
這就是給 kubectl 使用的組態檔,可以設定 KUBECONFIG 環境變數來指向它:
# Keep aks-engine output
rm -rf /deploy/output
mkdir -p /deploy/output
cp -R _output /deploy/output/aks_engine
cp aks_engine_sshkey* clusterDefinition.json /deploy/output/aks_engine/

# Expose KUBECONFIG environment variable to use kubectl
export KUBECONFIG=/deploy/output/aks_engine/${CLUSTER_PREFIX}/kubeconfig/kubeconfig.${LOCATION}.json
6. 執行 kubectl
接著就可以執行 kubectl 指令來操作 K8S 了,要跑 helm 也沒問題:
# Check k8s master/worker nodes
kubectl get nodes
(本頁面已被瀏覽過 188 次)